Case Study: enDAQ Sensor Firearms Testing

1 Comment
Share This
Share This

If you have ever shot a firearm, you are familiar with the ‘kick’ that occurs at every shot.  This imparts forces and stresses on the firearm, which are transferred into the shooter's shoulder and to any equipment that is attached to the firearm.

For a firearm and firearm accessory manufacturer, real world data on firearm accelerations is key in the development of products.  With known acceleration loads of different firearms, extensive testing can be conducted on vibrational test equipment such as shakers and impact facilities instead of with actual firearms and live ammunition. This allows for cheaper, faster, and more repeatable testing and equipment qualification. This same general approach applies to any product under development.

This post is an example of how you can use enDAQ's sensors (formerly known as Slam Stick) as a product development tool.  In this post, you can see how I manufactured a custom sensor mounting device to attach it to a wide range of firearms.  I then use the resulting data to show how you can characterize firearm recoil, firearm mechanics, ammunition, firearm hardware, and gather data for component development and testing.

What Can Acceleration Measurements Tell Us?

The recoil forces during firing are a results of the propellant gases (from the burning gunpowder) rapidly expanding to propel the bullet down range.  The magnitude of this force depends on 3 main things; the firearm, the bullet, and the propellant.  As the gas expands, it is pushing on everything around it, which is limited to the bullet and the firearm (through the bullet casing).  Using the conservation of momentum law, the resulting momentum of the firearm is going to be equal to the resulting momentum of the bullet and expelled propellant gasses.  Momentum is simply the product of the mass and velocity of that object.  If you are interested in the details, a mathematical study of firearm recoil is available at SAAMI.

Acceleration measurements can provide a great deal of information about a shooting event for various purposes.  I have broken them down into 4 main groups below. 

Gather Recoil Data for Product Development

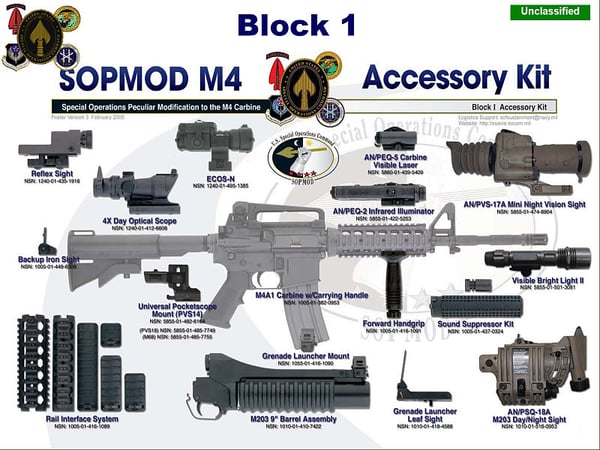
As discussed in the introduction, acceleration measurements can be used for product development.  Of particular interest are optics and scopes as they are typically very sensitive pieces of equipment.  As Leopold Optics puts it, their handgun scopes are “…extensively tested, to ensure they’re ready to withstand the crushing recoil dealt out by these hard-kicking guns.”  The image below is shows some accessories that are part of a SOPMOD kit as created by the Navy for various parts of the DoD.  Image of M4 accessories is in the public domain.
3_M4_PubDomain

Compare Rifle Configurations

With nearly any firearm, there are modifications that can be made to change the performance of the equipment.  For example, the user can get a longer barrel for long range competitive shooting or a silencer to further protect their hearing.  No matter what the configuration change, the performance of the rifle will change.  Nick Leghorn notes some recoil differences while evaluating a budget bolt action rifle compared to a higher end unit.  Typical configuration changes that may want to be evaluated include muzzle breaks, silencers, barrel length, and firearm weight with accessories.

Rifle Style and Firing Approach

Acceleration measurements on rifles can provide some interesting data on the rifle style and the firing approach.  For example: How does the recoil of a bolt action differ from a semi-auto when firing the same ammunition?  The data presented in subsequent sections will show an intriguing difference in the recoil of a semi-auto between a shot where additional rounds remain in the magazine and the final shot in the magazine when the bolt remains open.

Ammunition Evaluation

There exist many areas for ammunition evaluation with acceleration measurements.  Ammunition comes in many off the shelf configurations and is also very easy to load at home with a few pieces of equipment.   Much work has been done to evaluate ammunition muzzle velocity, accuracy, and penetration potential, however recoil impact remains an open area for study and testing.  In the following test results, I will present data comparing ammunition in similar packaging with different bullet loadings.  Areas of potential study relating to ammunition include. Image attribution: I, Arthurrh on English Wikipedia.
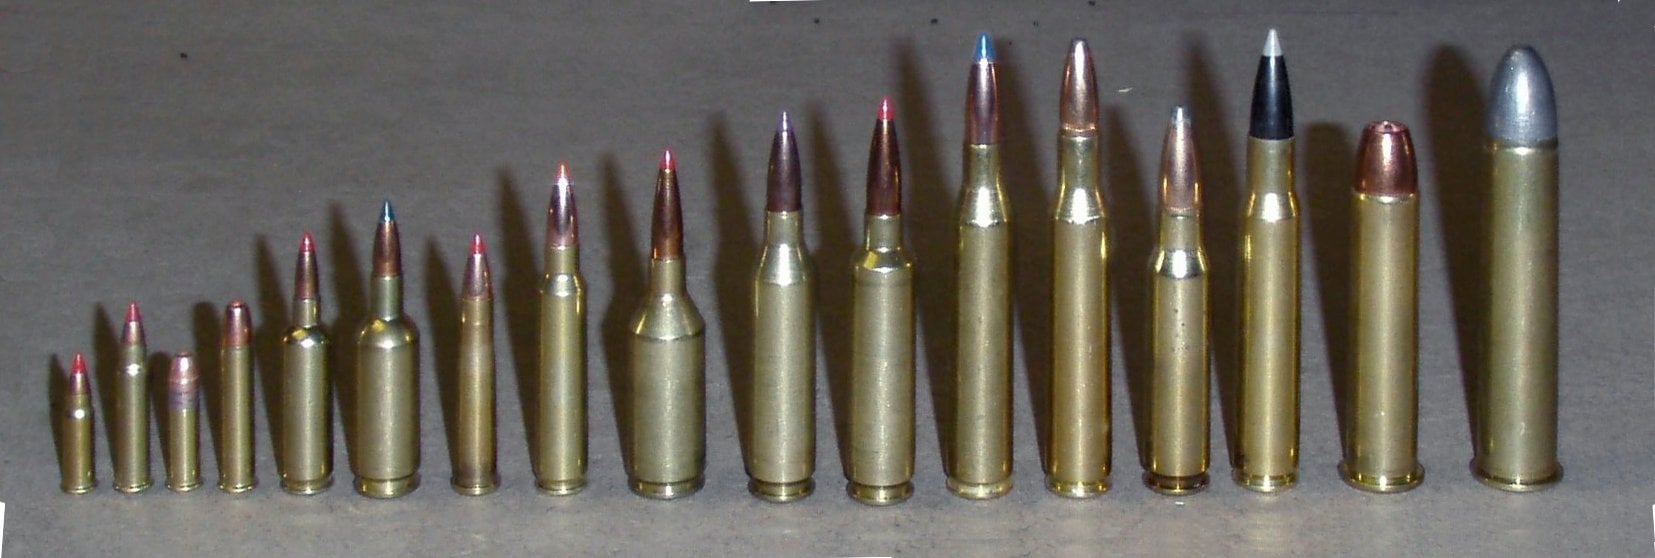
2_Cartridges


Testing Approach

Setup

Several different groups have built test fixtures to quantify the recoil of a firearm and evaluate different setups.  Shooting Times used a ransom rest to measure the relative recoil of a hand gun.  PRB built a more common test fixture with a load cell at the base to more directly measure the recoil into the shoulder of the shooter.  The Army (pdf download) uses a sled suspended by several wires in a pendulum configuration. These test fixtures allow for highly repeatable tests by taking out the human factor and related inconsistencies.  However, by doing so, they do not measure real world performance.  This is not necessarily bad and is a common trade off in testing to balances accuracy, cost, and repeatability.  For example, PRB's test fixture connects the load cell to a rigid piece of plastic to utilize the full butt pad of the rifle.  This takes out the damping of the shooters shoulder (and the rest of the body) resulting in higher recoil forces transferred to the load cell.

I chose a different approach to measure the recoil by attaching an accelerometer to the firearm.  While this configuration may not be as repeatable as the other approaches discussed, it offers several unique advantages since it records events in all 3 axis and in both directions, not just backwards recoil forces.  Another key advantage of my approach is the ability to take this solution into the field and gather real world data.  This real world data can then be used to program laboratory vibration equipment for in lab test.

Accelerometer Used

The accelerometer used for these tests is the enDAQ sensor (formerly Midé’s Slam Stick).  Since I did not know what accelerations to expect, I took 4 units to the range.  I started with a 6,000 g and 2,000 g both with metal enclosures.  During testing, I noticed that the accelerations rarely exceeded 500 g.  For increased accuracy, I switched to a pair of 500 g accelerometers, one in plastic and the other in metal.
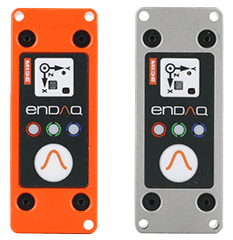
endaq-sensors-s3-s4

Mounting Method

In order to mount the enDAQ sensor to the rifles, a modified Picatinny riser mount was chosen.  The Picatinny rail is a standardized mounting rail that is common on many rifles in the US.  As such, it allows the accelerometer to be attached to a wide range of rifles quickly and securely.  The riser rail was modified by milling off a section of the groves in the rail to a flat surface.  An aluminum plate was bolted to the rail with (6x) 4-40 fasteners and secured with thread locker.  Additional threaded through holes allow the accelerometer to be attached to the aluminum plate.  I can now quickly attach the measurement device to any firearm with a Picatinny rail, where firearms accessories (such as scopes) would be mounted.
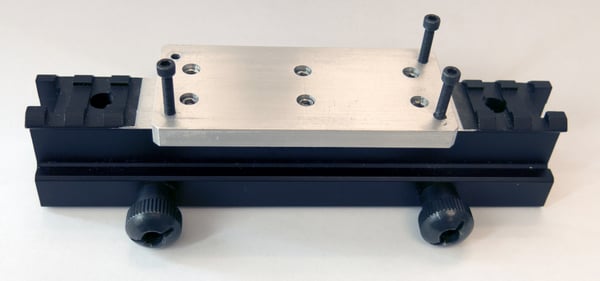
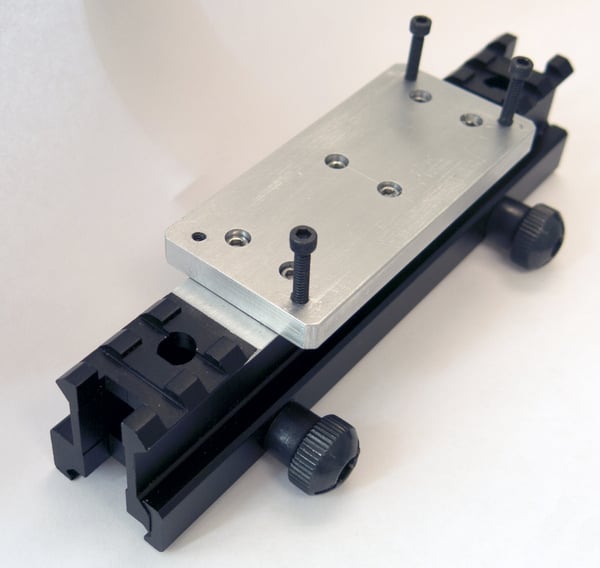
5_gun_mount1

6_gun_mount7

About Firearms Tested

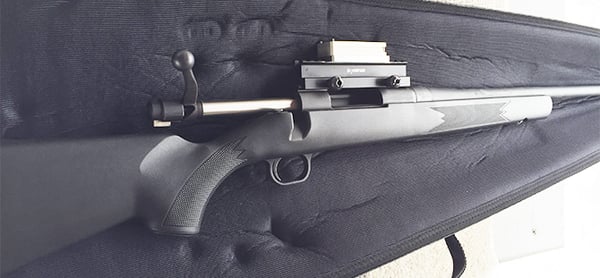
Two different rifles were tested.  The first rifle is the Mossberg 100 ATR (All Terrain Rifle) chambered in .308 Winchester.  This bolt-action rifle is a great entry-level rifle with a nice balance of accuracy, durability, and price.  A rifle of this type is quite versatile with many applications including medium range target shooting and police sniper.  Perhaps the most common use would be hunting.  With proper ammunition, distance, and shot placement, this rifle is capable of taking any game in North America.  Accessories would typically be limited to a sling for carrying and a scope for more accurate shot placement.  The accelerometer was mounted to the Picatinny mounts where the scope would normally be placed.
7_bolt_image

The second rifle tested is the Smith & Wesson M&P15 Sport.  The M&P15 Sport is a nice all around entry-level semiautomatic rifle in the AR-15 style.  The M&P15 has several versions with the Sport variant being the most basic.  Enthusiasts love this style rifle for its ease of customization and wide range of interchangeable parts and accessories.  As with the Mossberg, the accelerometer was mounted in place of the optics.  Image credit: Smith and Wesson.

10_MPsport


Test Results and Interpretations

I conduced three different tests to show the wide range of information that can be gathered from a simple accelerometer on a rifle.  The first set of tests looks at the impact of the bullets weight on the resulting acceleration profiles.  Data is provided that shows the acceleration in all 3 axis.  As you would expect, the main recoil has the highest acceleration, followed by a vertical acceleration, then a lateral (sideways) acceleration.

The second set of tests focus on the cycling of a round through a bolt action.  The acceleration data is correlated with a video and shows you how the motion of opening and closing the bolt can be detected.

The final set of tests were conducted on a semi auto rifle and compare two different rounds that appear very similar, but are not entirely interchangeable.

Bullet Weight (Grain) Comparison

Even in the same caliber, bullets are available in a wide range of weights (measured in grains).  Depending on the application and firearm, a particular grain bullet may be desired.  A good guide to choosing the right weight bullet is available at luckygunner.com.

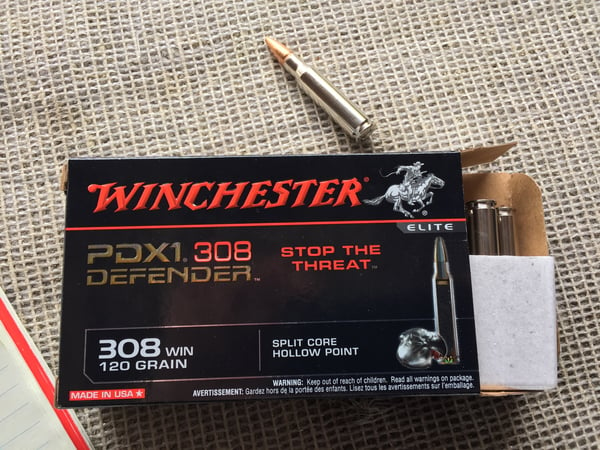
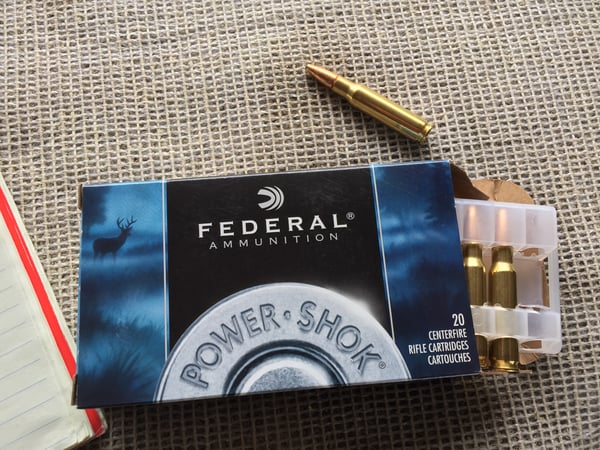
Tests were conducted with a plastic accelerometer and two different kinds of .308 ammunition including a 120 grain bullet manufactured by Winchester and a 180 grain bullet manufactured by Federal Ammunition.

Manufacturer

Winchester

Federal Ammunition

Brand

PDX1 Defender

Power Shok

Bullet Grain

120

180

Muzzle Velocity (ft/s)

2850

2570

Energy (ft lb)

2164

2640


11_ammo1

12_ammo2

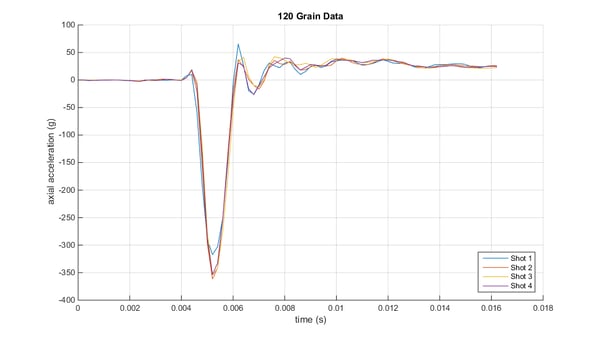
The following charts show four consecutive shots for each weight.  The test data is reasonably repeatable in both cases. 
 13_grain_A120

14_grain_A180

Overlaying all of the data, we can see that the data is very similar.  The main difference in the data is a small acceleration of approximately 20 g at the start of the event for the 120 grain unit.

15_grain_Ac

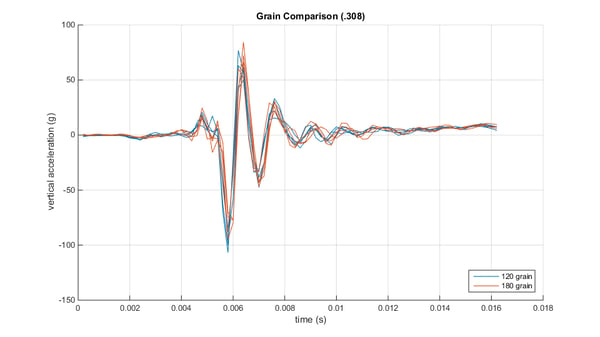
In the vertical direction, there are also some significant acceleration spikes on the order of 100 g’s.  This acceleration is due to the fact that the user usually grips the firearm below the barrel.  As the round is fired, the axial force makes the firearm want to rotate around the grip and move the tip of the barrel upward.

16_grain_Vc

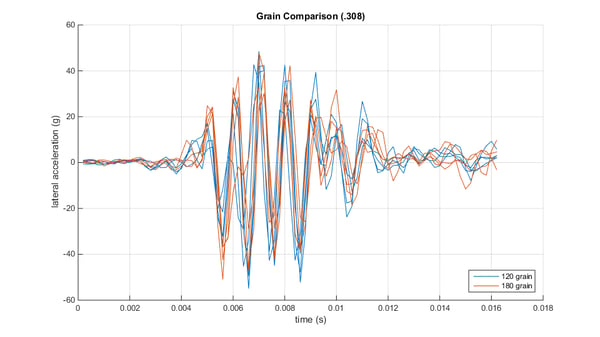
As expected, the acceleration in the lateral (side to side) direction is the smallest and mostly symmetric.

17_grain_Lc

Bolt Action Cycling

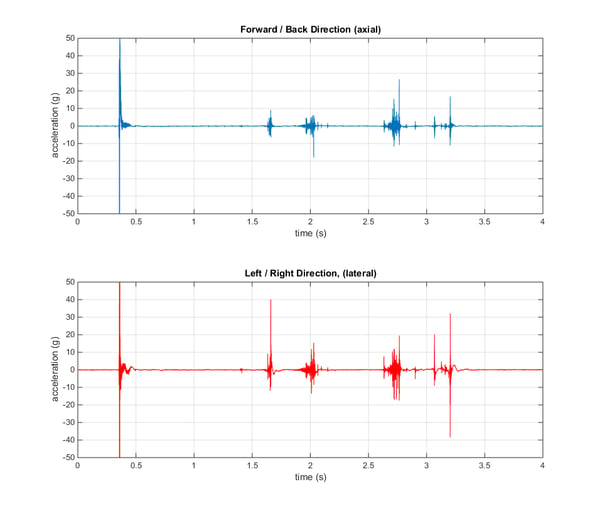
In the previous section, I covered the large accelerations that are witnessed in the firearm recoil.  Another interesting piece of data to look at is the acceleration due to cycling a round through a bolt action.  After the firing, the bolt is rotated upward, pulled back, pushed forward, and rotated downward to close it.  These 4 discrete motions and resulting data are visible in the video.  Static plots are provided below for clarity.  Note that the plots are scaled to +/- 50 g to better show the lower acceleration events.  These tests were conducted with a metal accelerometer.

18_Bolt_Actions

Ammo Comparison - 5.56 x 45 mm (NATO) and .223

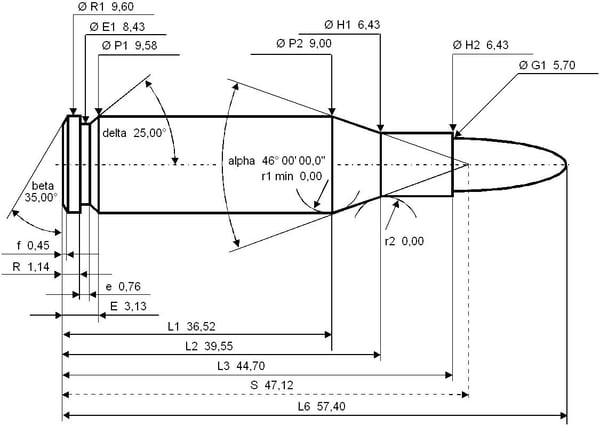
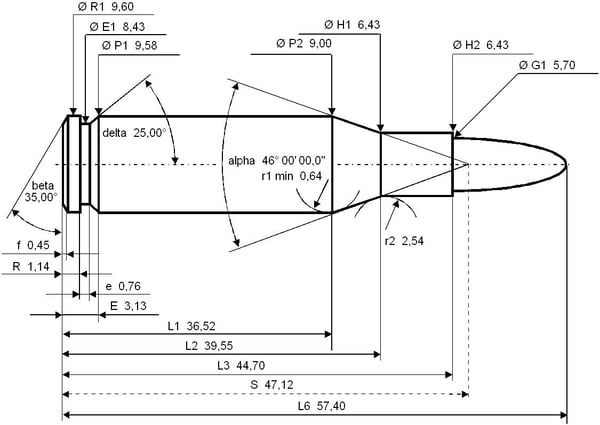
One common question raised by AR-15 users is “Does my gun fire 5.56 NATO or .223?”.  The short answer is if your barrel says 5.56, you can shoot 5.56 or .223.  If it says .223, you should only shoot .223.  SAAMI covers many unsafe arms and ammunition combinations.  These rounds are visually very similar, but they are rated for different pressures, which affect the performance of the round as well as the impact on the firearm.  Image credit: Francis Flinch at English Wikipedia.


20_223_Remington19_diagram556

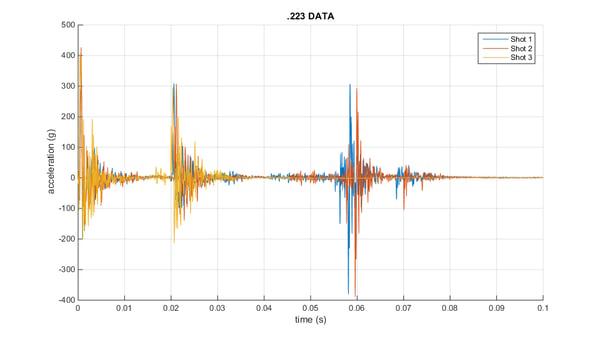
Using the M&P15 Sport (which is chambered for 5.56 and can safely shoot both) and a metal accelerometer, I first measured the accelerations when firing a series of .223 rounds.  The peak acceleration was approximately 400 g’s.  The data also shows the motion of the bolt carrier group cycling the firearm.  At approximately 0.02 seconds, the bolt carrier group (BCG) reaches the back its track after ejecting an empty shell.  At 0.06 seconds, the BCG reaches the front of the track after loading a new round.  The BCG reaching the front of the track creates another large acceleration, but in the opposite direction and lower in duration.  Three rounds were fired consecutively.  As is typical with semi-automatic firearms, when the final round was fired, the BCG did not return to the closed position.  For shot 3, this final acceleration is missing from the plots.

21_Fig_AR_1

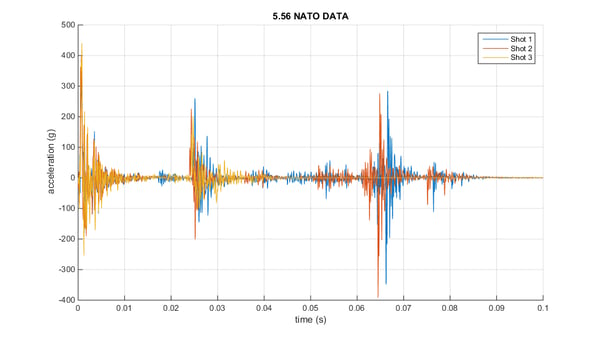
A very similar behavior is witnessed with the 5.56 NATO rounds.  The initial firing has a high acceleration.  As the BCG reaches the back of the track, another high acceleration is witnessed.  As a new round is loaded, another peak acceleration is witnessed in the opposite direction.

22_Fig_AR_2

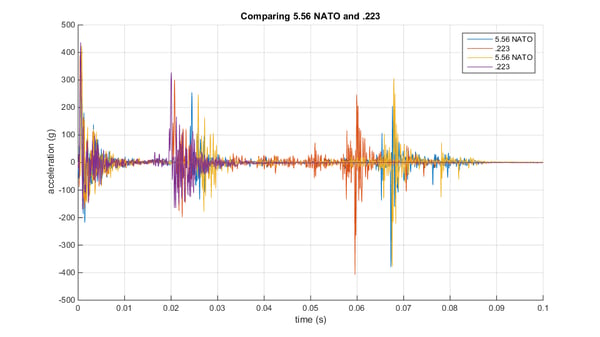
Between the two rounds, the overall accelerations were similar with a peak recoil acceleration of 400 g’s.  As a final test, 4 more rounds were loaded alternating between 5.56 and .223.  When viewed in this manner, differences are easier to identify.  The accelerations when the BCG reaches the back of the track are consistently higher for the .223 rounds.  This is also confirmed with the previous two sets of tests.  Another interesting observation is the timing of the events.  With the .223 round, the BCG reaches the back of the track in approximately 0.02 seconds.  However, a 5.56 round takes about 0.025 seconds.  For both rounds, the BCG returns forward approximately 0.04 seconds after reaching the back of the track.

23_Fig_AR_3

Since the main different in these two rounds is the resulting pressure, that is most likely the source of the timing difference.  This pressure is what causes the BCG to move backwards and cycle the firearm.  When the BCG is completely retracted, the pressure for both rounds should be equal, which correlates to the equal time between the BCG traveling from the back of the track to the front.

Based on the results, I would estimate that it takes the .223 round 0.075 seconds to complete a full cycle (equivalent to 800 rounds per minute) and the 5.56 round 0.08 seconds to complete a full cycle (750 rounds per minute).  Knowing the rate of fire for a specific ammo and firearm combination may be important in some military situations.  The user may want to fire as many rounds as possible to lay down cover fire (did you know a gunner on a helicopter has a hit rate of just 1 in 70 shots when firing at a wheeled vehicle?), or slow the rate of fire to conserve ammo and allow for more time to get back on target.  Other, more technical considerations may be of interest as well, such as the natural frequency of the equipment supporting the firearm, or any modes in the firearm’s accessories (optics, etc).


Conclusions

After manufacturing a custom mount for the accelerometer, the complete assembly was very easy to mount and swap between different rifles.  Although the riser mount has fasteners capable of being tightened by hand, a screw driver was used to provide additional torque for a more secure connection.  On several test firings, the resulting data showed very high accelerations (in excess of 2000 g) that were not repeatable.  This is a clear indication that the hardware is not properly attached and allowed high frequency chatter to occur and throw off the measurements.  Additionally, I would recommend re-torquing the bolts after a few test shots.

Although the sample size in these tests was very low, the results were shown to be very repeatable.  A high measurement frequency was essential in these tests.  The bolt action rifle tests were sampled at 5 kHz, however 20 kHz was required for the AR-15 tests to capture the impacts of the semi-automatic cycling.

Testing showed that a lot of interesting data can be gathered with a basic accelerometer including recoil, firearm mechanics, and ammunition characterization.  Similar to the 5.56 vs .223 ammo comparison, I did some tests comparing .308 and 7.62 x 51.  The results showed that the peak accelerations were similar, however the shock event of the .308 was longer in duration.  This makes sense for the higher power bullet.

In future testing, I plan to do a lot more ammo testing.  There are a lot of potential areas for investigation including the manufacturer’s consistency between different lots and home reloading.  Let me know if you have any acceleration tests you would like to see conducted.

For more on this topic, visit our dedicated Shock & Impact Sensors and Loggers resource page. There you’ll find more blog posts, case studies, webinars, software, and products focused on your shock testing and analysis needs.

Book a free demo with an engineer

Share This

Jeff Court

Jeff is the VP of Engineering at Mide Technology with a background in electrical and mechanical engineering. He has been a member of the team since 2012 and is active on several project at Mide and has worked on several projects including active flow control, aerial refueling, condition based maintenance, automotive electrical systems, and shaft sealing systems....

Case Study: enDAQ Sensor Firearms Testing

Posted by Jeff Court on Apr 6, 2016 9:36:32 AM
Jeff Court
Find me on:

If you have ever shot a firearm, you are familiar with the ‘kick’ that occurs at every shot.  This imparts forces and stresses on the firearm, which are transferred into the shooter's shoulder and to any equipment that is attached to the firearm.

For a firearm and firearm accessory manufacturer, real world data on firearm accelerations is key in the development of products.  With known acceleration loads of different firearms, extensive testing can be conducted on vibrational test equipment such as shakers and impact facilities instead of with actual firearms and live ammunition. This allows for cheaper, faster, and more repeatable testing and equipment qualification. This same general approach applies to any product under development.

This post is an example of how you can use enDAQ's sensors (formerly known as Slam Stick) as a product development tool.  In this post, you can see how I manufactured a custom sensor mounting device to attach it to a wide range of firearms.  I then use the resulting data to show how you can characterize firearm recoil, firearm mechanics, ammunition, firearm hardware, and gather data for component development and testing.

What Can Acceleration Measurements Tell Us?

The recoil forces during firing are a results of the propellant gases (from the burning gunpowder) rapidly expanding to propel the bullet down range.  The magnitude of this force depends on 3 main things; the firearm, the bullet, and the propellant.  As the gas expands, it is pushing on everything around it, which is limited to the bullet and the firearm (through the bullet casing).  Using the conservation of momentum law, the resulting momentum of the firearm is going to be equal to the resulting momentum of the bullet and expelled propellant gasses.  Momentum is simply the product of the mass and velocity of that object.  If you are interested in the details, a mathematical study of firearm recoil is available at SAAMI.

Acceleration measurements can provide a great deal of information about a shooting event for various purposes.  I have broken them down into 4 main groups below. 

Gather Recoil Data for Product Development

As discussed in the introduction, acceleration measurements can be used for product development.  Of particular interest are optics and scopes as they are typically very sensitive pieces of equipment.  As Leopold Optics puts it, their handgun scopes are “…extensively tested, to ensure they’re ready to withstand the crushing recoil dealt out by these hard-kicking guns.”  The image below is shows some accessories that are part of a SOPMOD kit as created by the Navy for various parts of the DoD.  Image of M4 accessories is in the public domain.

3_M4_PubDomain

Compare Rifle Configurations

With nearly any firearm, there are modifications that can be made to change the performance of the equipment.  For example, the user can get a longer barrel for long range competitive shooting or a silencer to further protect their hearing.  No matter what the configuration change, the performance of the rifle will change.  Nick Leghorn notes some recoil differences while evaluating a budget bolt action rifle compared to a higher end unit.  Typical configuration changes that may want to be evaluated include muzzle breaks, silencers, barrel length, and firearm weight with accessories.

Rifle Style and Firing Approach

Acceleration measurements on rifles can provide some interesting data on the rifle style and the firing approach.  For example: How does the recoil of a bolt action differ from a semi-auto when firing the same ammunition?  The data presented in subsequent sections will show an intriguing difference in the recoil of a semi-auto between a shot where additional rounds remain in the magazine and the final shot in the magazine when the bolt remains open.

Ammunition Evaluation

There exist many areas for ammunition evaluation with acceleration measurements.  Ammunition comes in many off the shelf configurations and is also very easy to load at home with a few pieces of equipment.   Much work has been done to evaluate ammunition muzzle velocity, accuracy, and penetration potential, however recoil impact remains an open area for study and testing.  In the following test results, I will present data comparing ammunition in similar packaging with different bullet loadings.  Areas of potential study relating to ammunition include. Image attribution: I, Arthurrh on English Wikipedia.

2_Cartridges


Testing Approach

Setup

Several different groups have built test fixtures to quantify the recoil of a firearm and evaluate different setups.  Shooting Times used a ransom rest to measure the relative recoil of a hand gun.  PRB built a more common test fixture with a load cell at the base to more directly measure the recoil into the shoulder of the shooter.  The Army (pdf download) uses a sled suspended by several wires in a pendulum configuration. These test fixtures allow for highly repeatable tests by taking out the human factor and related inconsistencies.  However, by doing so, they do not measure real world performance.  This is not necessarily bad and is a common trade off in testing to balances accuracy, cost, and repeatability.  For example, PRB's test fixture connects the load cell to a rigid piece of plastic to utilize the full butt pad of the rifle.  This takes out the damping of the shooters shoulder (and the rest of the body) resulting in higher recoil forces transferred to the load cell.

I chose a different approach to measure the recoil by attaching an accelerometer to the firearm.  While this configuration may not be as repeatable as the other approaches discussed, it offers several unique advantages since it records events in all 3 axis and in both directions, not just backwards recoil forces.  Another key advantage of my approach is the ability to take this solution into the field and gather real world data.  This real world data can then be used to program laboratory vibration equipment for in lab test.

Accelerometer Used

The accelerometer used for these tests is the enDAQ sensor (formerly Midé’s Slam Stick).  Since I did not know what accelerations to expect, I took 4 units to the range.  I started with a 6,000 g and 2,000 g both with metal enclosures.  During testing, I noticed that the accelerations rarely exceeded 500 g.  For increased accuracy, I switched to a pair of 500 g accelerometers, one in plastic and the other in metal.

endaq-sensors-s3-s4

Mounting Method

In order to mount the enDAQ sensor to the rifles, a modified Picatinny riser mount was chosen.  The Picatinny rail is a standardized mounting rail that is common on many rifles in the US.  As such, it allows the accelerometer to be attached to a wide range of rifles quickly and securely.  The riser rail was modified by milling off a section of the groves in the rail to a flat surface.  An aluminum plate was bolted to the rail with (6x) 4-40 fasteners and secured with thread locker.  Additional threaded through holes allow the accelerometer to be attached to the aluminum plate.  I can now quickly attach the measurement device to any firearm with a Picatinny rail, where firearms accessories (such as scopes) would be mounted.

5_gun_mount1

6_gun_mount7

About Firearms Tested

Two different rifles were tested.  The first rifle is the Mossberg 100 ATR (All Terrain Rifle) chambered in .308 Winchester.  This bolt-action rifle is a great entry-level rifle with a nice balance of accuracy, durability, and price.  A rifle of this type is quite versatile with many applications including medium range target shooting and police sniper.  Perhaps the most common use would be hunting.  With proper ammunition, distance, and shot placement, this rifle is capable of taking any game in North America.  Accessories would typically be limited to a sling for carrying and a scope for more accurate shot placement.  The accelerometer was mounted to the Picatinny mounts where the scope would normally be placed.

7_bolt_image

The second rifle tested is the Smith & Wesson M&P15 Sport.  The M&P15 Sport is a nice all around entry-level semiautomatic rifle in the AR-15 style.  The M&P15 has several versions with the Sport variant being the most basic.  Enthusiasts love this style rifle for its ease of customization and wide range of interchangeable parts and accessories.  As with the Mossberg, the accelerometer was mounted in place of the optics.  Image credit: Smith and Wesson.

10_MPsport


Test Results and Interpretations

I conduced three different tests to show the wide range of information that can be gathered from a simple accelerometer on a rifle.  The first set of tests looks at the impact of the bullets weight on the resulting acceleration profiles.  Data is provided that shows the acceleration in all 3 axis.  As you would expect, the main recoil has the highest acceleration, followed by a vertical acceleration, then a lateral (sideways) acceleration.

The second set of tests focus on the cycling of a round through a bolt action.  The acceleration data is correlated with a video and shows you how the motion of opening and closing the bolt can be detected.

The final set of tests were conducted on a semi auto rifle and compare two different rounds that appear very similar, but are not entirely interchangeable.

Bullet Weight (Grain) Comparison

Even in the same caliber, bullets are available in a wide range of weights (measured in grains).  Depending on the application and firearm, a particular grain bullet may be desired.  A good guide to choosing the right weight bullet is available at luckygunner.com.

Tests were conducted with a plastic accelerometer and two different kinds of .308 ammunition including a 120 grain bullet manufactured by Winchester and a 180 grain bullet manufactured by Federal Ammunition.

Manufacturer

Winchester

Federal Ammunition

Brand

PDX1 Defender

Power Shok

Bullet Grain

120

180

Muzzle Velocity (ft/s)

2850

2570

Energy (ft lb)

2164

2640


11_ammo1

12_ammo2

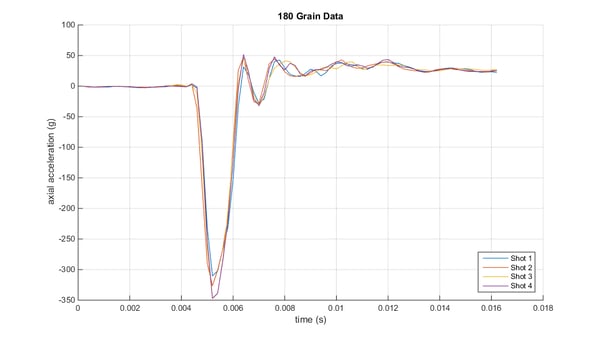
The following charts show four consecutive shots for each weight.  The test data is reasonably repeatable in both cases. 
 13_grain_A120

14_grain_A180

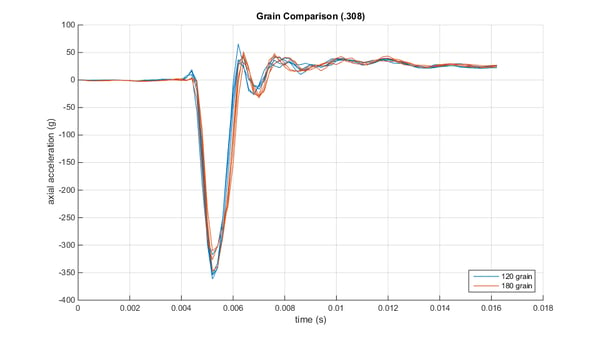
Overlaying all of the data, we can see that the data is very similar.  The main difference in the data is a small acceleration of approximately 20 g at the start of the event for the 120 grain unit.
15_grain_Ac

In the vertical direction, there are also some significant acceleration spikes on the order of 100 g’s.  This acceleration is due to the fact that the user usually grips the firearm below the barrel.  As the round is fired, the axial force makes the firearm want to rotate around the grip and move the tip of the barrel upward.
16_grain_Vc

As expected, the acceleration in the lateral (side to side) direction is the smallest and mostly symmetric.
17_grain_Lc

Bolt Action Cycling

In the previous section, I covered the large accelerations that are witnessed in the firearm recoil.  Another interesting piece of data to look at is the acceleration due to cycling a round through a bolt action.  After the firing, the bolt is rotated upward, pulled back, pushed forward, and rotated downward to close it.  These 4 discrete motions and resulting data are visible in the video.  Static plots are provided below for clarity.  Note that the plots are scaled to +/- 50 g to better show the lower acceleration events.  These tests were conducted with a metal accelerometer.
18_Bolt_Actions

Ammo Comparison - 5.56 x 45 mm (NATO) and .223

One common question raised by AR-15 users is “Does my gun fire 5.56 NATO or .223?”.  The short answer is if your barrel says 5.56, you can shoot 5.56 or .223.  If it says .223, you should only shoot .223.  SAAMI covers many unsafe arms and ammunition combinations.  These rounds are visually very similar, but they are rated for different pressures, which affect the performance of the round as well as the impact on the firearm.  Image credit: Francis Flinch at English Wikipedia.
 

20_223_Remington19_diagram556

Using the M&P15 Sport (which is chambered for 5.56 and can safely shoot both) and a metal accelerometer, I first measured the accelerations when firing a series of .223 rounds.  The peak acceleration was approximately 400 g’s.  The data also shows the motion of the bolt carrier group cycling the firearm.  At approximately 0.02 seconds, the bolt carrier group (BCG) reaches the back its track after ejecting an empty shell.  At 0.06 seconds, the BCG reaches the front of the track after loading a new round.  The BCG reaching the front of the track creates another large acceleration, but in the opposite direction and lower in duration.  Three rounds were fired consecutively.  As is typical with semi-automatic firearms, when the final round was fired, the BCG did not return to the closed position.  For shot 3, this final acceleration is missing from the plots.
21_Fig_AR_1

A very similar behavior is witnessed with the 5.56 NATO rounds.  The initial firing has a high acceleration.  As the BCG reaches the back of the track, another high acceleration is witnessed.  As a new round is loaded, another peak acceleration is witnessed in the opposite direction.
22_Fig_AR_2

Between the two rounds, the overall accelerations were similar with a peak recoil acceleration of 400 g’s.  As a final test, 4 more rounds were loaded alternating between 5.56 and .223.  When viewed in this manner, differences are easier to identify.  The accelerations when the BCG reaches the back of the track are consistently higher for the .223 rounds.  This is also confirmed with the previous two sets of tests.  Another interesting observation is the timing of the events.  With the .223 round, the BCG reaches the back of the track in approximately 0.02 seconds.  However, a 5.56 round takes about 0.025 seconds.  For both rounds, the BCG returns forward approximately 0.04 seconds after reaching the back of the track.
23_Fig_AR_3

Since the main different in these two rounds is the resulting pressure, that is most likely the source of the timing difference.  This pressure is what causes the BCG to move backwards and cycle the firearm.  When the BCG is completely retracted, the pressure for both rounds should be equal, which correlates to the equal time between the BCG traveling from the back of the track to the front.

Based on the results, I would estimate that it takes the .223 round 0.075 seconds to complete a full cycle (equivalent to 800 rounds per minute) and the 5.56 round 0.08 seconds to complete a full cycle (750 rounds per minute).  Knowing the rate of fire for a specific ammo and firearm combination may be important in some military situations.  The user may want to fire as many rounds as possible to lay down cover fire (did you know a gunner on a helicopter has a hit rate of just 1 in 70 shots when firing at a wheeled vehicle?), or slow the rate of fire to conserve ammo and allow for more time to get back on target.  Other, more technical considerations may be of interest as well, such as the natural frequency of the equipment supporting the firearm, or any modes in the firearm’s accessories (optics, etc).


Conclusions

After manufacturing a custom mount for the accelerometer, the complete assembly was very easy to mount and swap between different rifles.  Although the riser mount has fasteners capable of being tightened by hand, a screw driver was used to provide additional torque for a more secure connection.  On several test firings, the resulting data showed very high accelerations (in excess of 2000 g) that were not repeatable.  This is a clear indication that the hardware is not properly attached and allowed high frequency chatter to occur and throw off the measurements.  Additionally, I would recommend re-torquing the bolts after a few test shots.

Although the sample size in these tests was very low, the results were shown to be very repeatable.  A high measurement frequency was essential in these tests.  The bolt action rifle tests were sampled at 5 kHz, however 20 kHz was required for the AR-15 tests to capture the impacts of the semi-automatic cycling.

Testing showed that a lot of interesting data can be gathered with a basic accelerometer including recoil, firearm mechanics, and ammunition characterization.  Similar to the 5.56 vs .223 ammo comparison, I did some tests comparing .308 and 7.62 x 51.  The results showed that the peak accelerations were similar, however the shock event of the .308 was longer in duration.  This makes sense for the higher power bullet.

In future testing, I plan to do a lot more ammo testing.  There are a lot of potential areas for investigation including the manufacturer’s consistency between different lots and home reloading.  Let me know if you have any acceleration tests you would like to see conducted.

For more on this topic, visit our dedicated Shock & Impact Sensors and Loggers resource page. There you’ll find more blog posts, case studies, webinars, software, and products focused on your shock testing and analysis needs.

Book a free demo with an engineer

Topics: Sensors & Data Acquisition, Shock & Impact Sensors & Loggers

By signing up you are agreeing to our Privacy Policy