
Proper mounting technique is critical for optimal performance... accelerometer performance that is!
Incorrect accelerometer mounting techniques can result in grossly inaccurate vibration data. Yet, accelerometer mounting is often overlooked in vibration measurement. It's time to pay attention to how you mount your accelerometer!
There are four main mounting techniques that we'll cover in this post:
- Stud Mounting (screws/bolts)
- Adhesive (epoxy, wax, tape etc.)
- Magnetic
- Handheld
The Importance of Accelerometer Mounting
The method of mounting the accelerometer to the vibrating structure and the coupling between the sensor and the measurement point is a critical factor in obtaining accurate results. Mounting types and methods influence the resonant frequency of the accelerometer. And when this happens, the useful frequency range of the accelerometer is impacted (see our post on accelerometer specifications for more information on frequency response).
Amplification Factor at Resonance
Accelerometers, piezoelectric in particular (here's a rundown on the different types of accelerometers), have a very high amplification factor at resonance too; so it’s important to avoid using a mounting method that shifts the resonance into the frequency range of your vibration environment. Figure 1 provides a plot of the typical amplification factor at resonance depending on mounting type. Beware that the units are in decibels; a +10 dB relative sensitivity equates to a 3.1x multiplication factor.
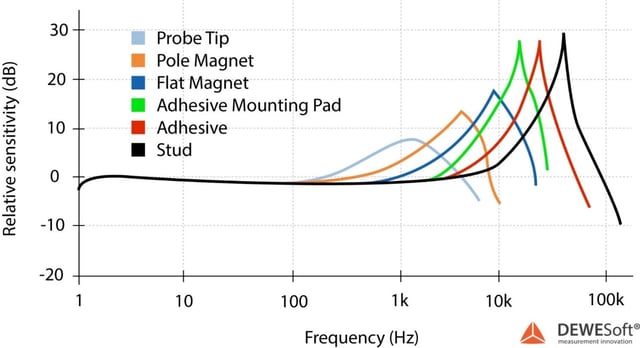
Usable Frequency Range
The plot in Figure 1 is a nice comparison of where the resonance is for different mounting techniques; but with it on a decibel scale it's difficult to see what the amplitude deviation is in the usable frequency range. I put together a representative plot in Figure 2 that zooms in to the frequency range below 10,000 Hz and a more appropriate amplitude scale.

Keep in mind this is the typical performance change of an accelerometer due to mounting. Different accelerometers will have different high and low frequency performance that will influence this response curve. But the major take-away should be that mounting has a huge influence on the accelerometer's frequency response! Also, before you can select the mounting type to use, you must determine what the measurable frequency range you're targeting.
Mounting Types
Now let's look even within different mounting types, how the frequency response and performance can change depending on your technique.
Stud Mounting
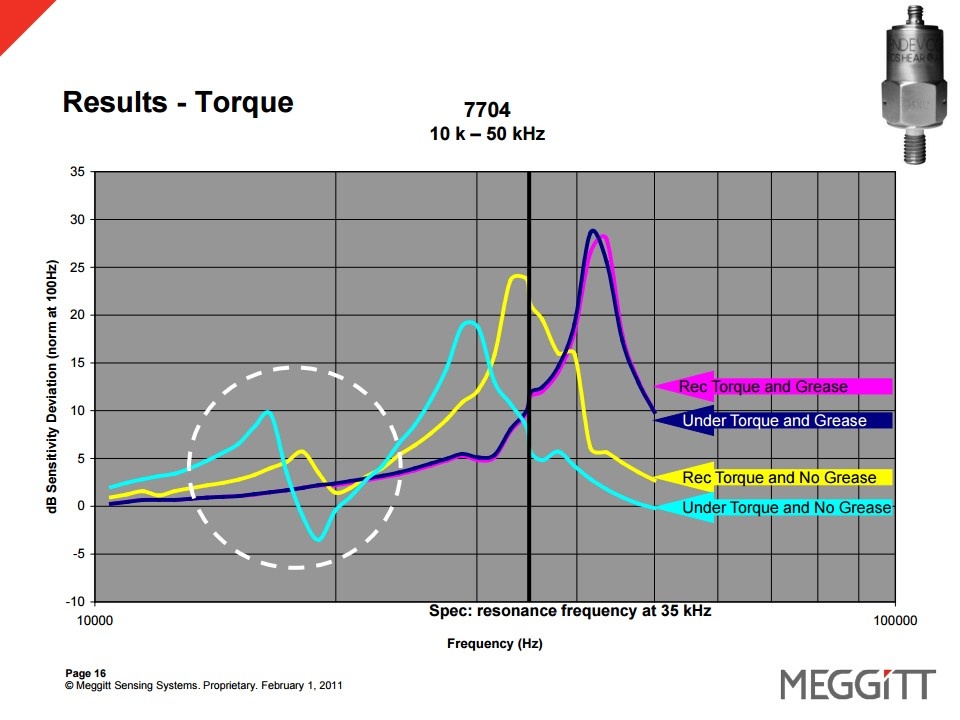
This represents the best mounting method in terms of accelerometer performance and will maximize the frequency response of the accelerometer. It’s important to torque the accelerometer down to the manufacturer’s specifications; inadequate mounting torque can reduce the frequency response. Perhaps the most important factor when stud mounting is to use a coupling fluid such as grease, oil, petroleum jelly or beeswax. Using a coupling fluid solves a lot of mounting problems including inadequate mounting torque, surface flatness, and surface roughness.
Figure 3 provides a comparison on the frequency response for when an accelerometer is under torqued and/or no coupling fluid is used. The data presented is from an excellent MEGGITT/Endevco presentation and resource on accelerometer mounting.
Adhesive
There are several different adhesives to consider when mounting your accelerometer. Surprisingly though, the most important parameter for accelerometer performance is not the adhesive type, rather it is the thickness of the adhesive that plays the largest role. Figure 4 provides a few plots of the frequency response of different adhesives (data is taken from that same Endevco presentation) which illustrates what little difference there is.

Loctite or Epoxy
Loctite or a two part epoxy offers a permanent mounting option which improves repeatability and testing time. There are many different types of Loctite; but 454 is a popular type for accelerometer testing. Must times the accelerometer can also be dismounting with a small shear load from the tap of a hammer (be careful not to damage the sensor or test article though!). Accelerometer manufacturers will recommend using a de-bonding agent like Acetone and gently twisting the accelerometer.
Wax or Duct Seal Putty
Wax or duct seal putty are other popular adhesives that aren’t as effective as Loctite or epoxy but still offer surprisingly good frequency response. The major benefit of using this type of adhesive is that removal of the accelerometer is much easier. Hi-Test, who does much of the shock and vibration testing for large military systems, recommends using duct seal putty for shock testing because it can mechanically filter out high frequency (and thus low energy) vibration content that could risk exciting an accelerometer’s internal resonance. Petroleum wax would have similar benefits; but note that this can have adverse effects for an application that is interested in higher frequency vibrations. Blanchard wax is a much stiffer adhesive and may be preferred for these applications.
Double Sided Tape
Double sided tape is often thought to not be strong or stiff enough to be used as an effective mounting method for accelerometers. They do offer the lowest frequency response of all the adhesives but for many applications it is still plenty effective enough. enDAQ has had good luck with the 3M 950 adhesive transfer tape for its sensors (formerly known as Slam Stick) products (a 5 yard roll is actually included with each unit). Endevco’s study found that the thickness of the adhesive is the most important factor and this is only 0.005” thick (0.1 mm). If the 950 tape is adequately compressed then there is no discernible difference in the enDAQ sensor's performance compared to mounting with bolts. The downside of this particular tape is that it’s quite tacky and can be difficult to remove. 3M offers an adhesive eraser wheel which is effective at removing this tape and other adhesives.
Adhesive Mounting Pad
Adhesive mounting pads offer the very high frequency response of adhesives and stud mounting; but allow the engineer to easily swap out accelerometers. For large structures when you may be doing modal analysis it is much easier to instrument the structure with adhesive mounting pads first (no wiring, and less expensive) then attach the accelerometers for your test. At the end of testing the accelerometers can easily be taken off and brought to the next test. If, after analyzing the data, the team determines more testing is needed then having the mounting pads remain on the structure ensures that the tests can be repeatable. Adhesive mounting pads also help prevent epoxy from damaging expensive accelerometers. Here are some accelerometer mounting bases from PCB; but there are many accessory options out there.
Magnetic Mounting Base
For ferrous magnetic structures a magnetic mounting base allows easy and mess-free accelerometer mounting. There are two types of magnetic bases: flat, and curved; flat offers the best frequency response. You should use caution with magnetic mounting bases to not damage your structure or injure yourself. But these are a great solution for short term testing applications. Here are some accelerometer magnetic mounting bases from PCB.
Hand Held or Probe Tip
Some applications can be difficult to reach for proper mounting and/or have sensitive coatings or materials that prevent adhesives or bolting. A probe tip can be utilized to press the accelerometer to the structure by hand. This obviously drastically reduces the measurable frequency range to less than 100 Hz or so. Because humans can’t remain perfectly still either, they are not recommended for frequency ranges less than 10 Hz.
What You Need to Know
- How an accelerometer is mounted can have significant impact on frequency performance.
- Stud mounting is best; but use grease or jelly!
- Adhesives work very well, so long as the bond line is thin (< 0.005"). Even double sided tape is a great solution!
Additional Resources
If you'd like to learn a little more about various aspects in shock and vibration testing and analysis, download our free Shock & Vibration Testing Overview eBook. In there are some examples, background, and a ton of links to where you can learn more. And as always, don't hesitate to reach out to us if you have any questions!
For more on this topic, visit our dedicated Wireless Sensors resource page. There you’ll find more blog posts, case studies, webinars, software, and products focused on your wireless accelerometer testing and analysis needs.